Welcome to my little corner of the blogosphere to share the ups and downs of starting a craft business, with plenty of tips, mishaps and the odd glass of wine!
Showing posts with label pirate tutorial. Show all posts

Tuesday, 15 September 2015

DIY Pirate Hook Tutorial - Make Your Own Pirate Costume Series

Arrrrrrhhhhh Me Hearties!

It be another in my series of Pirate Tutorials today.

Okay, that's enough Pirate Speak!

Today we're going to make a Pirate Hook to go with the Pirate Sword and the Eye Patch I've shared before previous International Speak Like a Pirate Day's (which this year is this coming Saturday)


You Will Need:

- Felt - colour of your choice (one A4 sheet per hook) 
- 2 x Plastic cups
- Metal hook from a plastic coat hanger
- Glue
- Ribbon or Braid
- Sugru (if you have any - otherwise you can use glue and blue tac)
- Awl (if you don't have one, anything with a sharp point, like a metal skewer will work)

Instructions:

1. Cut a slit in one of the plastic cups, all the way to the base and cut off the bottom (try to cut as close to the base as possible) then remove the rim as well as this makes it easier to flatten out. Flatten out on top of your felt and draw around the plastic. Cut out the felt leaving at leas a 1" seam allowance all the way round.


2. Glue the felt to the other plastic cup, folding the felt over the rim of the cup and gluing down.


3. Draw around the base of the cup and cut out the felt piece. Then glue this onto the base of the cup. With the awl (or metal skewer) carefully make a hole through the felt and the cup in the centre of the cup base.


4. Glue your ribbon or braid around the join at the base of the cup.


5. Insert the hook into the base of the cup and secure in place. If you have Sugru follow the instructions on the packet and attach the sugru to the inside of the cup, with the hook in place (see Picture 6) but if not, once the hook is in place, add a blob of blue tac to the inside of the cup, to hold the hook in place and place a blob of glue on the outside, where the hook goes into the cup. The glue will dry clear.


6. With a clear cup that has not had the felt wrapped round it yet, I've shown here what to do with the Sugru (or blue tac). Sugru takes 24 hours to dry, hence this being the last step.


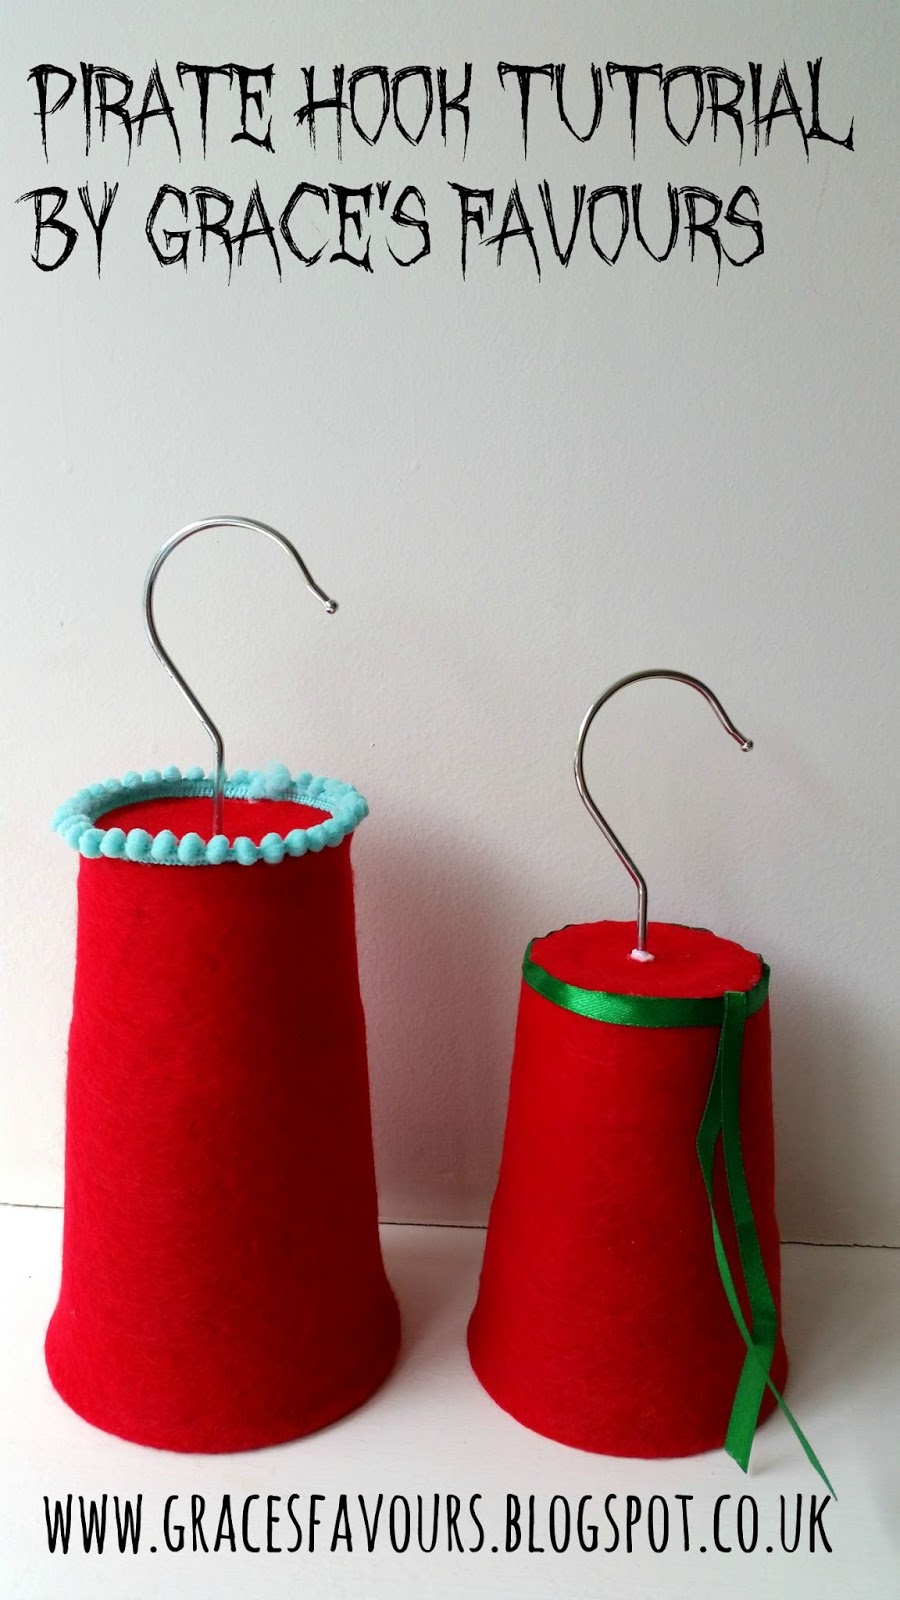
7. And here is your finished cup ready to play with! Well done!


As I'm posting this on the day I've made my Pirate Hooks I've not got any pictures to show you of my little pirates playing with them, but check back tomorrow and once the Sugru has dried I'll allow them to be road tested!

Have fun and enjoy Talk Like a Pirate Day!


Tuesday, 16 September 2014

International Talk Like A Pirate Day - round up of great Pirate Patterns

Ahoy ye land lubbers! It's International Talk Like A Pirate Day on the 19th September and I thought I'd do a quick round up of some cool Pirate Patterns from me and others:


Starting from the top right:

- Free Pirate Eye Patch Tutorial I designed last year, which can be found here,

- Roger The Pirate Softie Pattern, designed by Abby Glassenberg, which I featured on the blog a couple of weeks ago (here) and can be bought from Abby's website While She Naps,

- Then there is my son's favourite - the Pirate Sword, which is another of my free tutorials, found here,

- Next up is this seriously cool Pirate Hide Out pattern, by Miss Pretty Pretty on Etsy and can be bought here,

- The crochet Pirate Ship Pattern is amazing - I just wish I could crochet! It's by Sky Magenta (also on Etsy) and can be found here

- And lastly is the Pirate Treasure Map that can be found in my Etsy shop here

Hope you have some fun making Piratey things this week and that your little ones enjoy playing with them!

Sunday, 22 September 2013

Mumpreneur Awards - making the finalist group!

Well, I have so much to share this week I don't really know where to start!!

This is my 3rd blog post this week (almost unheard of!) as I shared two Piratey tutorials for a Pirate Eye Patch and a Pirate Sword in honour of International Talk Like a Pirate Day on Thursday (September 19th)

pirate eye patch tutorial - diy felt pirate eye patch
pirate sword tutorial - diy felt pirate sword


Then I found out on Tuesday that I had been selected for the finals of the Mumpreneur UK Awards!

I was in total shock!

I entered back in January and then promptly forgot all about it and when the finalists were announced on the Mumpreneur Facebook page I had a nosey, wasn't on the list for either Best Product or Best International Seller (the two categories that I'd entered) and slunk off to lick my wounds in private.

BUT.... I got an email on Tuesday saying they'd been having some problems getting in touch with some of the finalists and here were the details of what they needed from me as I was a finalist in the Best International Seller category!

WOOOOOOO-HOOOOOOOO!

Out of approx. 1500 entries, each category is whittled down to 8-10 finalists and I was one of them! I'm over the moon :-)

Quickly put everything they needed together and emailed it all over, whilst also writing a press release for the local media, to see if it wasn't too late to get some publicity and I got a phone call yesterday saying one of the local papers will be sending a reporter & photographer out to me on Monday (tomorrow!) and the piece will be in the paper on Wednesday!

Yay.... but... wait..... "What about the tip you call a workshop?" my helpful husband asked, last night, while we were away celebrating our anniversary!

So today, I have lugged, shoved, tidied, junked, retrieved from the bin, found homes for and put up on walls all the stuff that had been covering the floor of my workshop! I still have a big pile of paper to sort though, but it does now resemble a room that someone works in, not just a fabric dumping ground gone wrong!

Need to make a curtain to hide everything under the workbench!

Sign stolen from the Home & Gift Exhibition

Finally got some of my work displaid!
So my lovelies, that's me for now... off to make some dinosaur cushions, put more things up on the walls and try and hide this big wodge of paperwork!!

Enjoy Handmade Monday!

Thursday, 19 September 2013

How to Make a Felt DIY Pirate Sword Tutorial

Arrrrrrr, me hearties! It be International Talk Like a Pirate Day!

Yesterday I shared a Felt Pirate Eye Patch Tutorial which was admirably modeled by my own little Pirate last night:

pirate eye patch tutorial

And was then borne off to school by my bigger Pirate this morning:


So today I'm going to share with you my tutorial for making a Felt Pirate Sword. This is quite timely as my smallest Pirate was bought one (a very flimsy one!) last weekend and promptly broke it, so he needed a replacement!


You will need:

- Cardboard - A4 size (either two pieces of thinner cardboard stuck together or a piece of thick cardboard that won't flop about when waved about)
- Grey Felt (9" x 8")
- Black Felt (11" x 6")
- A Biro
- Strong Scissors (for cutting the cardboard)
- Grey & Black embroidery thread
- A piece of ribbon and matching embroidery thread
- Glue
- Template (which can be found at the end of the tutorial)

First cut out the template and draw round it onto the cardboard & cut out. (if you are using thin cardboard, cut two pieces and stick them together)


Then draw around the cardboard onto the grey felt with your biro and cut out leaving a 1/4" extra around the edge

Flip the cardboard sword over and repeat so you have two mirror images on the grey felt for the blade part of the sword


Then repeat on the black felt for the handles. If you have tailors chalk you can use that to draw round to see the lines more easily, but I found I could just about see the biro lines if I held the felt up to the window:


Then using a bit of glue to keep the grey felt in place, with the grey embroidery thread (2 strands) blanket stitch neatly all the way round the grey felt to make the blade


Next using glue to keep the black pieces in place, with the black embroidery thread (2 strands) blanket stitch all the way round the black felt to make the handle.


Lastly sew or tie a piece of ribbon around the join between the black & grey felt


And now you're ready for a swashbuckling adventure!


pirate sword, felt sword, diy sword, make your own sword, how to make a sword, felt toy


Please feel free to make this felt sword as many times as you like for personal use, but please do not sell either the finished items, or the tutorial and if you blog or want to share any of the pictures from the tutorial, please link back to this post.

I'd love to see any Piratey pictures that you take if you've created either the eye patch or the sword using my tutorials, so please feel free to send them to simmi@gracesfavours.co.uk

Enjoy!


Wednesday, 18 September 2013

How to Make a Felt DIY Pirate Eye Patch Tutorial

In honour of tomorrow being my favourite celebration day, International Talk Like a Pirate Day I thought I'd share a tutorial with you today, ready for your little Pirates to wear tomorrow (or any time if your kids are like mine!)

A Felt Pirate Eye Patch


You will need:

Black Felt
White Felt
Black Elastic
Scissors
White & Black embroidery thread
A pencil or tailors pen
The pattern (which can be found at the end of the tutorial)

Step One:

Cut out 2 black eye patch pieces and 1 white skull & cross bones piece


Then using the skull & cross bones template as a guide mark on the white felt the position of the eyes and the nose and using sharp embroidery scissors cut out the eye sockets and the nose


Then using either a sharp pencil or a tailor's pen (which has disappearing ink) draw on your mouth and teeth:


Then using the black embroidery thread (2 strands) and using a back stitch, embroider on your mouth and teeth. You should now have a finished skull


Next using the white embroidery thread (again 2 strands) with a simple running stitch, sew on the skull and cross bones to the top layer of the eye patch


Once you've gone all the way round, your eye patch will look like this


Next using your black embroidery thread sew the elastic onto the back piece of the eye patch, securely going over it a number of times


Then repeat for the other end


Then pin your front eye patch piece to the back and sew round the edges, using your black embroidery thread and using a simple running stitch, but making sure you go over the elastic bits 2 or 3 times to ensure they're secure


And tie off your thread neatly at the back.

You now have an eye patch fit for a real Pirate, me hearty! Arrrrrrr!


And here is my little Pirate modelling her eye patch


I'm afraid (as is always the way!) that my printer/scanner has just decided to play up, so I've taken a photo of the template page and will get my husband to scan it in for me from work tomorrow, so it should be available as a printable sheet then! Why do printers always go wrong at just the most inconvenient moment?!


pattern instructions for make your own felt pirate eye patch

Please feel free to make as many of these eye patches as you'd like for personal use, but please do not sell the finished articles or the instructions.

I'd love to see any pictures of anything that you make using any of my tutorials, so please do feel free to email me a picture at simmi@gracesfavours.co.uk

Enjoy and Arrrrrrrrrrr!

Another felt tutorial will be available tomorrow.

Sharing Buttons