Pages

Thursday, 30 April 2015

How To: Make a DIY Dog Collar Tutorial

A couple of months ago I was asked to do some work by the London Transport Museum as they were opening a new children's section of the museum and wanted some toy dog puppets as part of their promotions.

Well I had to make 6 or 7 a prototype and this one, which is the only one who looked sensible enough to be finished off, has been claimed by Patrick and named Rosette (Don't ask!!):


Ever since he 'claimed' her, he's been asking me to make her a collar, as I'd made one for Seren's enormous Dog, Kate, last summer (Kate was purchased by Seren, with her own money in a shop in Ireland, while we were on holiday and had to have her own seat in the car on the way back as she is so enormous!)

So I thought I would share the process with you.

You Will Need:

Tape Measure
Felt Scraps
Embroidery Thread
Small Piece of Ribbon
Small Piece of Elastic
Needle, pins, scissors
Sewing Machine (optional)

Instructions:

1. Have your dog/cat/teddy/cuddly toy/real animal (?!?!) at the ready


2. Measure your dog loosely round the next


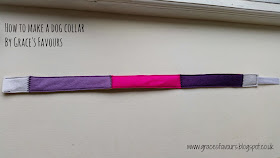
3. My dog's neck size was 20", so I wanted to have 18" of felt and 2 inches of elastic. Patrick had chosen pink, purple and white as his colours, so I have 1.5" of white felt, 5" of dark purple, pink & light purple each and then another 1.5" of white felt, each piece is 1" thick. Lay them out on a larger piece of felt, which will become the back of the collar.


4. Either by hand or by machine, sew the ends of each felt piece to the backing - I chose to use a zigzag stitch with black thread. If you are sewing by hand a running stitch or back stitch would do fine.


5. Pin the elastic into one end of the collar, between the white felt at the top and the beige felt at the bottom. Then sew from the other end (leaving that end open) along the long side, across the elastic, making sure it's sewn in securely and back down the other long side. Leave the remaining short end open for the moment. Now cut away the excess backing felt, so you are left with only the 1" thick strip of double layer felt.


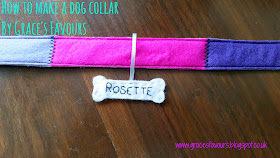
6. If you want to add a bone with a name on to your collar, this is the stage. So on another piece of felt embroider your dog's name and then cut around the name, shaping the felt into a bone shape. Pin this bone shape to another piece of felt and cut around that. Sandwich the ribbon in between the two bone pieces and sew round the outsides of the bone, I used a pale pink thread and a running stitch - it just needs to keep the bones together & keep the ribbon in place. Then thread the collar through the ribbon.


7. Finally thread the elastic into the open end of the collar and sew the end closed.


And you will have one dog collar, all ready to be worn! (And in my case, one VERY happy little boy!)


I hope you've enjoyed this tutorial. If you would like to reference it or link back, please feel free to borrow a couple of pictures, as long as you link back to this post, but please do not reissue the whole tutorial without prior permission.

Wednesday, 15 April 2015

Bargains Galore - Things You Can Find In A Charity Shop

Do you like Charity Shops?

My Outlaws (as I affectionately refer to my lovely gorgeous In-Laws!) have been staying with us and they do like a mooch around a charity shop and as their designated driver I like to be obliging.

Well, luckily for them the towns near us are choc-full of charity shops, so off we headed, each day for a little explore.

I went with them not really expecting to find anything I really wanted, but was poking around in some baskets hidden away in one, when I came across loads, and I really do me LOADS of skeins of embroidery thread and little reels of coloured cottons.


The skeins were marked up as being 50p each and I had over 20 so I was expecting them to charge me at least £10 which was still a bargain as they were all brand new.... but they ummed and ahhed over someone buying so many and tried to charge me £3!!! For all that!?! I was gobsmacked and said £5 at least (I know, the normal practice when haggling is to try and get the seller to come down in price, not go up!) so we settled there in the end - I came out feeling like I'd got a great bargain (which of course I had, as anyone know regularly buys large amounts of thread will know) and they felt they'd been over paid, which I guess probably doesn't happen very often... so we were all happy.

Oh and my Outlaws bought (over the 2 weeks):

- 1 handbag
- 4 ladies tops
- 1 walking stick
- 1 glass dish
- 2 girls' dresses
- 1 ladies' coat
and 3 childrens' books!

Think we all did quite well!

Sunday, 12 April 2015

Behind the Scenes: Making Mini Campervan Mobiles

Do you ever try and set yourself targets to beat whilst doing something boring? I do... such as,

'Last time I had to draw around and cut out 24 small 1/3 of a triangle funny shapes it took me 35 minutes....' (for the Celtic Knotwork Penny Rug Pattern)

These funny little bits made up the trinity knots on my new Celtic Knotwork Pattern
'So next time I'm going to try and do it in 30 minutes'


Well, that's the kind of bet I have with myself when I'm doing something repetitive, so this morning, when I had to cut out and sew up 12 mini Campervan bodies, I wanted to see how long it would take me to sew up 5 (the number I use for the baby mobiles I make:


So I paused to quickly take an action shot (to make the post more interesting!)


And off I went.

13 miniutes, to sew up 5 mini campervan carcasses.

6 pauses in the 13 minutes:

1 to take a pic
1 to refill the bobbin
4 to umpire in rows between the children... despite there being 3 other adults in the house it seems it's still my job to stop whatever I'm doing and run in to prevent WW3 taking place in the playroom over who's turn it is with the remote control/barbie and her horse/the loom band gizmo/etc!!!

So, now that's my target to beat for next time!

And finally... a gratuitous shot of my messy desk, my gorgeous Benedict Cumberbatch calendar and the drama I had to pause on BBC iPlayer as otherwise I'd have done no sewing at all!!!


Saturday, 11 April 2015

Great Crafts for Children's Birthday Parties

You may remember I posted a while ago about a birthday party I was asked to host for a group of 9 year olds at our local craft shop. The first party I did was a bit hit and miss because I'd not thought through how much help the girls might need and how awkward it would be without patterns for them to follow, so this time I was prepared.

I made a sample of the what they were going to make:


The bags I pre-cut with the folds marked and I had a selection of buttons, hair bands (for the closure loop), cord for the straps and hama beads so they could make hang tags.

Again this was a 9 year old's party and with the exception of one of the girls, they all had a fairly good idea of sewing so although they needed help with threading their needles and knotting the thread, they were all off and raring to go.

They all chose to start with creating their hang tags and then moved onto making the bags and here are their results:


The girls had great fun making their bags, they all wore them home (although two escaped before I could take photos!) and the Mum's seemed really pleased with what they had made.

I think in hindsight 2 hours would have been better than an hour and a half and I could have staggered them so they didn't all get to the same stage at the same time, but it was a really fun afternoon and I will be actively promoting them now as I feel like I was quite happy in my comfort zone (much more so than last time!)

If you were thinking of holding a party at home for children aged 7 - early teens creating something like this would be perfect - but be prepared for a big mess to clear up and the kids needing a lot of help!!